Pilot Drill Markings
PILOT DRILL WARNING:
Prior to using a pilot drill, it is imperative that its markings are identified and understood.
No assumption should be made about the height of the first marking. If there is any doubt about the markings on any drill or reamer, take a measurement prior to using the reamer.
Latch Reamer Markings
LATCH REAMER WARNING:
The reamers are used sequentially beginning with a 2.5mm diameter and ending with the diameter of the intended implant.
Reamers have horizontal markings at 6.0, 8.0, 11.0 and 14.0mm, whereas older reamers may have different markings.
It is imperative that the depth indicators on the latch reamers are known prior to surgery.
No assumptions should be made about the height of the first marking on any latch reamer. If there is any doubt about the markings on any drill or reamer, take a measurement prior to using the reamer.
Handpiece Maintenance
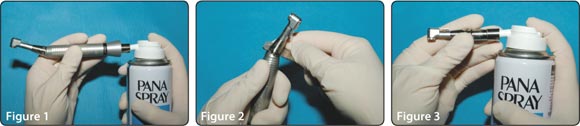
Cleaning and Lubrication
- Attach the metal spray nozzle into the back of the handpiece and insert the pana spray into the metal spray nozzle. (Figure 1)
- Spray for approximately 2 seconds.
Disassemble the head from the handpiece using the supplied wrench. (Figure 2) - Spray into the head. (Figure 3)
- Assemble the head to the handpiece sheath in the reverse order of disassembly. Make sure that the two keys at the union nut align with the slots in the sheath and tighten the union nut.
- Wipe the assembled handpiece clean.
Note: Clean and lubricate the contra-angle handpiece after each use.
Sterilization
- Wipe any debris off with an alcohol-soaked cloth.
- Lubricate the handpiece using spray lubricant. Insert the handpiece into a sterilizing pouch and seal it.
- Autoclave for 15 minutes at 135° C (275° F). Do not set the sterilizer temperature above 135° C (275° F).
- To expel excess oil, operate the handpiece before using it intra-orally.
Note: The 20:1 handpiece is autoclavable